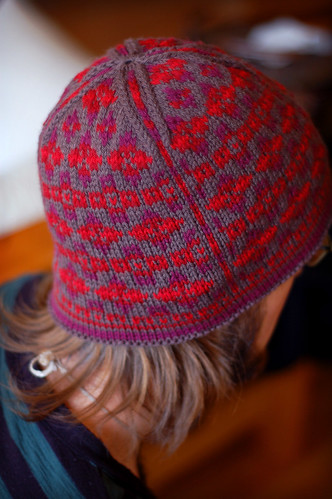
 Pattern: Red Light Special
Size: to fit an average adult head (21-23")
Gauge: 24 sts and 26 rows = 4 in/10 cm
Skill Level: Intermediate to Advanced
Needles*:
- One 16" circular needle in size necessary to get you gauge.
- One set of DPN's of the same size.
- One 16" circular needle two sizes smaller than your main needle (for lining)
* Circular needles with cables longer than 16" can be used with Magic Loop Method with similar results. Suggested needle sizes are US 4-6 to get gauge. Your results may vary.
Materials: KnitPicks 'Telemark' (100% Wool, Sport Weight.)
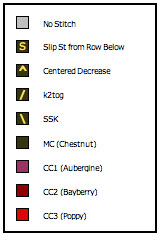
- 1 skein MC (Chestnut)
- 1 skein CC1 (Aubergine)
- 1 skein CC2 (Bayberry)
- 1 skein CC3 (Poppy)
- Lining Yarn; a partial skein of sport weight cotton or merino (something soft to satisfy the ears of the wearer)
Techniques Employed: knit and purl; provisional cast on; turned hem; directional decreasing (ssk and k2tog); stranded knitting with 4 colors (never more than 2 colors on one row);
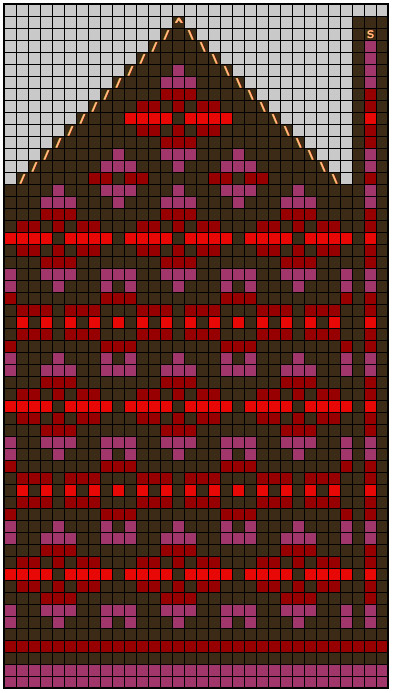
Summary: This hat is worked in basic Norwegian style beginning with the cotton/merino lining, followed by a turning row of purl stitches, the main body chart of the hat (knit with 4 colors) and ending with a rapid decrease crown (decrease 8 sts ever round). The chart provided below repeats itself 4 times around the circumference of the hat, dividing it into four sections with four faux seams that shape the crown decreases cleanly towards the center.
If you have never worked a hat in this style, I recommend reading the complete pattern at least one time through before you begin to best familiarize yourself with the construction techniques.
D I R E C T I O N S:
Lining: With smaller circular needle and Lining Yarn provisionally cast on 128 sts. Join stitches and place marker to indicate beginning of round. Work in stockinette (k all sts) until lining measures 3".
Next Row: Switching to Larger circular needle and MC (Chestnut), knit one round.
Next Row: purl all sts (this is considered the 'turning row')
Main Body: With CC1 (Aubergine), knitting all sts, begin working chart. Please see 'Special Notes' below in regard to carrying colors. NOTE: When you have worked 3" of main hat pattern, you will be joining the lining
After 3" of the main chart have been worked (or when the length of the lining is exactly equal to the length of the main body), you will join the hem. This process is worked over one entire row of knit stitches.
Joining the Hem: Fold lining along turning row so that WS of lining and WS of body are facing one another. You should have the same number of sts along your provisional cast-on as you do live stitches (128). Feed all provisionally casted on loops onto the length of your smaller circular needle, ending at the beginning of the round. Making sure that all stitches are lined up begin joining the hem by knitting first body stitch together with first hem stitch (as a k2tog). Repeat k2tog for every pair of stitches all the way around [in essence you will be doing 128 k2togs and seaming the lining onto the main body as you knit. This method yields a clean and professional hem with no finishing required!]
When you complete this round, resume working chart as before until you reach your first decrease round.
Shaping the Crown: Decreases are included in the chart. Decrease 1 st on each side of every 'seam' on every round. Switch to Double Pointed Needles when the number of stitches becomes too small for your circular. You will be decreasing at a rate of 8 stitches per row, yielding a rather flat crown. Because of the length of the main chart, a flat crown is necessary to get correct sizing.
When you complete the chart, you will have 16 stitches remaining on the needles. Cut a 10" tail of MC, thread through a tapestry needle and draw through 16 remaining sts. Pull tail to tighten opening and weave into fabric to secure. Weave in all remaining ends. Block hat (see below).
Blocking: Blocking is a NECESSITY with stranded knitting. It will also even out tension issues in an incredible way. Fill a sink with lukewarm water and half a capful of wool wash (I prefer non-rinse wool washes like Eucalan). Immerse hat in water, gently squeezing out any air that's caught up in your stranding. Let that hat soak for 5-10 minutes. Remove from water, gently squeeze out all excess water. DO NOT WRING OR TWIST FABRIC. Roll inside a dry towel and stomp on it to get out all moisture possible. Shape hat over a 'head-shaped' object (I prefer a medium size cereal bowl place upside down on top of a paper towel roll). Air dry.
Special Notes:
* Carrying colors: You may choose to carry all three Contrasting Colors up the inside of the hat along the seam. I did this and it worked relatively well, although it does add a bit of bulk. If you wish to cut your ends at the conclusion of each color section, this will work fine. Beware, however, that you will have a whole bunch of ends to weave in during finishing.
* Jody has an informative post about turning a hem here that may help you visualize the process.
If you find any mistakes in the pattern, please feel free to send me an e-mail at brooklyntweed@gmail.com and I will amend the pattern to help future knitters. Also, I encourage you to e-mail me with pictures of your finished hats - I do so love seeing your work.
I'm happy to share this pattern with you, fair readers - thank you for supporting what I do here!
All content and photos are ©brooklyntweed. All rights reserved. This pattern is for personal and non-profit use ONLY. You may print this pattern only if copyright information stays intact. You may not sell items made from this pattern for profit or distribute these patterns in a retail environment to promote yarn sales.
0 comments:
Post a Comment